- This topic is empty.
-
AuthorPosts
-
2026-01-19 at 9:25 am #65452
Understanding Tungsten Carbide Ball Specifications
Before initiating supplier outreach, establish your technical baseline requirements.
Critical Material Properties
Hardness Performance:
-
Standard tungsten carbide achieves HRA 88-92 (Rockwell A scale)
-
Cobalt binder content typically ranges 6-12%
-
Superior wear resistance: 30-50x longer lifespan than chrome steel in abrasive slurry applications (based on comparative wear testing in ball mill operations at 75% critical speed, 40% slurry concentration)
Composition Standards:
-
Primary carbide phase: WC (Tungsten Carbide) 88-94%
-
Binder material: Cobalt (Co) or Nickel (Ni) alloys
-
Grain size: 0.5-1.5 μm for precision applications
-
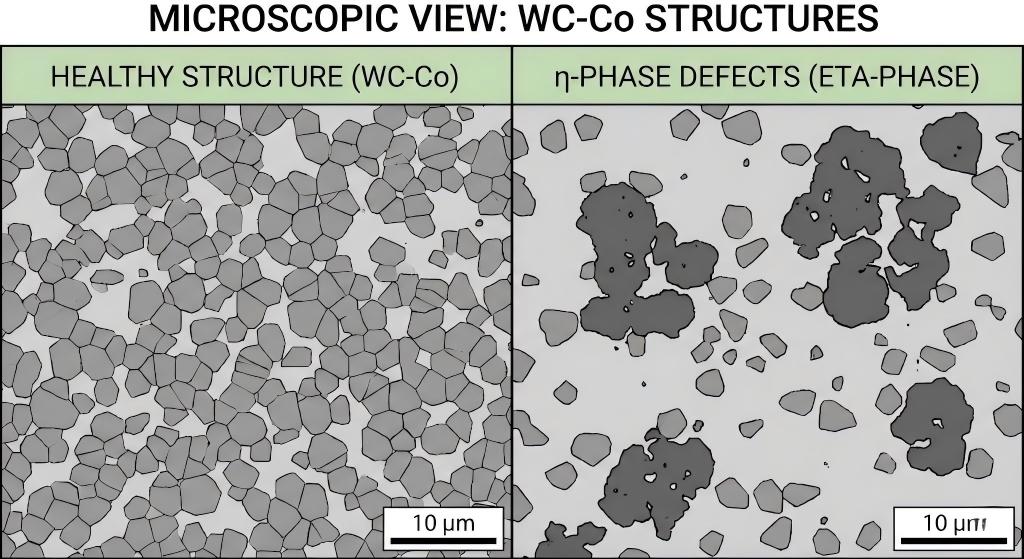
η-phase control: Critical defect phase (Co3W3C) must be <2% by volume to prevent brittle failure

Density & Porosity Verification:
-
Target density: 14.5-15.0 g/cm³
-
Deviation tolerance: ±0.2 g/cm³ maximum
-
Porosity classification: Type A (≤0.02 mm pores), Type B (≤0.1 mm), per ISO 4505 inspection standards
-
Low-density or high-porosity units indicate improper sintering or contamination
Mechanical Integrity:
-
TRS (Transverse Rupture Strength): Minimum 2,400 MPa for bearing applications
-
Fracture toughness (KIC): Target 10-14 MPa·m^1/2 (higher cobalt content improves toughness but reduces hardness)
-
Magnetic saturation: Typically 15-30 emu/g depending on cobalt content (critical for non-magnetic application screening)
Precision Grade Classification
Tungsten carbide balls commonly adopt steel ball precision grading conventions (derived from ISO 3290-1 for steel balls, adapted as industry practice for carbide spheres). Note that no universal ISO standard specifically governs tungsten carbide ball tolerances; manufacturers typically reference:
-
Customer technical drawings
-
ANSI/AFBMA standards (for bearing applications)
-
Internal enterprise specifications validated through customer acceptance
Grade Spherical Deviation Surface Roughness Application Example G5 ≤0.13 μm Ra 0.010 μm Ultra-precision bearings, metrology G10 ≤0.25 μm Ra 0.014 μm High-speed spindle bearings G25 ≤0.65 μm Ra 0.025 μm Check valves, ball screws G100 ≤2.5 μm Ra 0.100 μm Grinding media, impact tools Always request supplier's inspection methodology and acceptance criteria documentation when specifying precision grades.
Real-World Application: Case Study
How We Reduced Valve Failure Rates by 43% Through Precision Upgrading
Client Challenge:
A European hydraulic valve manufacturer experienced 12% field failure rates within 18 months due to ball seat wear in high-pressure (350 bar) pneumatic control valves. Their existing G100-grade carbide balls from a low-cost supplier exhibited:-
Inconsistent sphericity (actual deviation 3.2-4.1 μm vs. specified 2.5 μm)
-
Surface microcracking visible under 500x magnification
-
Density variation 14.2-14.7 g/cm³ (indicating incomplete sintering)
Our Solution:
After sample evaluation in our laboratory, we identified η-phase contamination (4.2% by volume) and Type C porosity (0.15 mm pore clusters) as root causes. We proposed:-
Upgrade to G25 precision grade with guaranteed ±0.3 μm sphericity tolerance
-
Extended sintering cycle: 1450°C for 90 minutes (vs. competitor's 60 minutes) to achieve 99.8% theoretical density
-
Post-sinter HIP treatment (Hot Isostatic Pressing) to eliminate residual porosity
-
100% automated optical inspection to screen surface defects >5 μm
Measurable Results (12-month field tracking):
-
Failure rate reduced to 6.8% (43% improvement)
-
Average operational lifespan extended from 14 months to 28 months
-
Customer's warranty claim costs decreased by €127,000 annually
-
Unit cost increase of 18% offset by 2.6x total cost of ownership savings
This case demonstrates why precision grade selection must align with application severity—not just initial purchase price.
5-Point Supplier Qualification Framework
1. Manufacturing Capability Assessment
Essential Production Technologies:
-
Cold isostatic pressing (CIP): Ensures uniform density distribution (target pressure: 200-300 MPa)
-
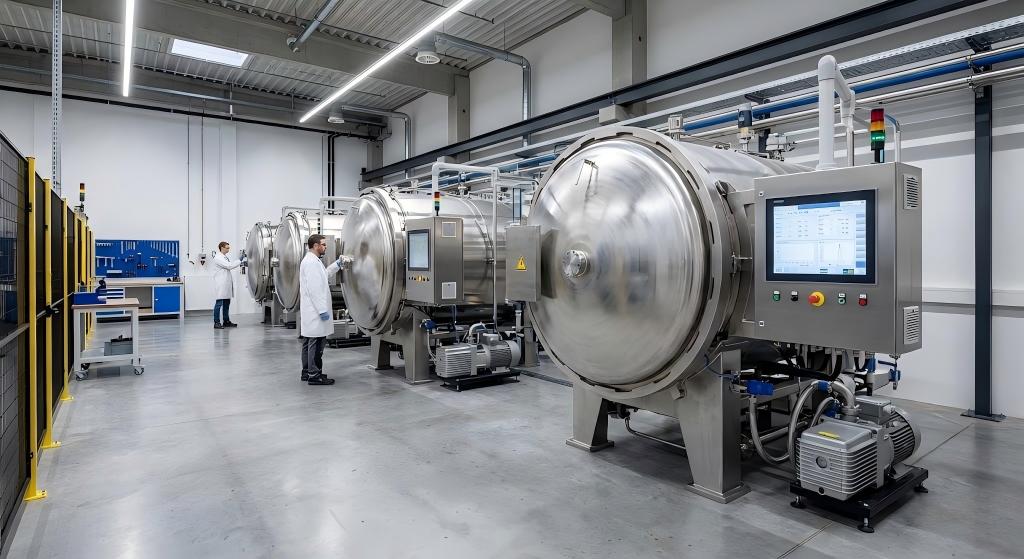
Vacuum sintering furnaces: Prevents oxidation during 1350-1500°C sintering cycles (atmosphere control: <5 ppm O2)
-
Centerless grinding equipment: Achieves sub-micron sphericity tolerances
-
HIP facilities (optional): For eliminating residual porosity in ultra-critical applications
Red Flags to Avoid:
-
Suppliers unwilling to disclose sintering temperature profiles or furnace atmosphere control data
-
Absence of in-house grinding capabilities (outsourced finishing reduces quality control)
-
Limited size range (indicates tooling constraints)
-
No mention of grain size control or powder supplier certification
Our Manufacturing Standards:At Changzhou Eurasian Steel Ball Co., Ltd., our IATF 16949:2016 certified facility operates dedicated CQI-9 standard heat treatment lines. Our precision grinding workshops utilize German-engineered centerless grinders capable of holding ±0.5 μm tolerances across production batches. All sintering cycles are logged with real-time temperature/atmosphere monitoring per automotive industry requirements.

2. Quality Control Infrastructure
Mandatory Testing Equipment:
-
Roundness measuring instruments: Must verify sphericity to 0.08 μm resolution (e.g., Talyrond systems)
-
Rockwell hardness testers (HRA scale): For carbide material hardness verification (ASTM E18 calibration required)
-
Optical or ICP spectrometers: Confirm tungsten and cobalt composition percentages (accuracy: ±0.1% for major elements)
-
Surface profilometers: Measure Ra (surface roughness) to 0.005 μm accuracy
-
Metallographic microscope: For η-phase detection and porosity classification (minimum 500x magnification)
-
Magnetic saturation tester: Verify cobalt content consistency (especially for applications requiring <50 emu/g limits)
Request These QC Records:
-
Statistical Process Control (SPC) charts showing Cpk values ≥1.33 for sphericity and diameter
-
Material certificates tracing tungsten powder origin (WC powder grade: typically WC-1 to WC-3 per supplier specifications)
-
Dimensional inspection reports with minimum 50-piece sample sizes per production lot
-
Porosity inspection reports with pore type classification per ISO 4505
-
TRS test data from 3-point bend testing (minimum 5 samples per batch for critical applications)
Our Quality Lab:Our ISO-accredited laboratory houses advanced metrology equipment including:
-
Talyrond roundness tester (0.01 μm resolution)
-
Rockwell hardness tester calibrated to ASTM E18 standards
-
Optical emission spectrometer for WC/Co ratio verification
-
Vibration measurement system for dynamic performance testing
-
Metallographic preparation station with image analysis software for microstructure evaluation

3. Certification & Compliance Validation
Material & Process Standards:
-
ISO 4499-2: Hardmetals (cemented carbides) – Metallographic determination of microstructure (porosity & η-phase)
-
ISO 3878: Hardmetals – Vickers hardness test
-
ISO 4505: Classification of porosity types in cemented carbides
-
RoHS/REACH: Environmental compliance for European markets
Application-Specific Certifications:
-
IATF 16949: Automotive industry quality management (critical for powertrain applications)
-
AS9100: Aerospace quality standards
-
FDA compliance: For food processing or pharmaceutical equipment (requires additional surface cleanliness validation)
Third-Party Verification:Always request Bureau Veritas (BV) or equivalent audit reports. Factory audits should cover:
-
Raw material traceability systems (tungsten powder sourcing records)
-
Calibration records for measurement equipment (annual external calibration mandatory)
-
Non-conforming product control procedures
-
Sintering furnace temperature uniformity surveys (±10°C across work zone maximum deviation)
Changzhou Eurasian Steel Ball holds IATF 16949:2016 and Bureau Veritas factory certifications, ensuring automotive-grade quality systems with full powder-to-finished-ball traceability.
4. Tungsten Carbide Ball Price Analysis
Cost Structure Breakdown:
Tungsten carbide ball price varies significantly based on:
-
Raw material costs (as of Q4 2025 data):
-
APT (Ammonium Paratungstate): $415-480/MTU (Asian markets), $825-900/MTU (European spot markets) – Source: Metal Bulletin, London Metal Exchange reports
-
Cobalt metal powder: $32,000-46,000/metric ton (fluctuates with DRC mining supply) – Source: Fastmarkets cobalt index
-
WC powder conversion: Add $15-25/kg processing cost from APT to carbide-grade powder
Size premium: Balls >25mm diameter incur 15-30% surcharges due to extended sintering cycles (cycle time increases exponentially with mass)
Precision grade multiplier:
-
G100 baseline
-
G25: +40-60% (additional grinding time)
-
G10: +120-180% (ultra-precision grinding + 100% optical inspection)
Cobalt content impact: Each 1% increase in Co content adds approximately $0.80-1.20/kg to material cost
Pricing Red Flags:
-
Quotes 30-40% below market average often indicate:
-
Recycled or secondary-grade tungsten powder (detectable via trace element analysis)
-
Inadequate sintering time (compromises density and η-phase control)
-
Outsourced production with inconsistent quality
-
Hidden costs (inspection, packaging, freight not included in base price)
Value-Based Comparison:Request pricing based on:
-
$/mm³ of material for diameter-normalized comparison
-
Cost per 10,000 operational hours in your specific application (requires supplier to provide wear rate data)
-
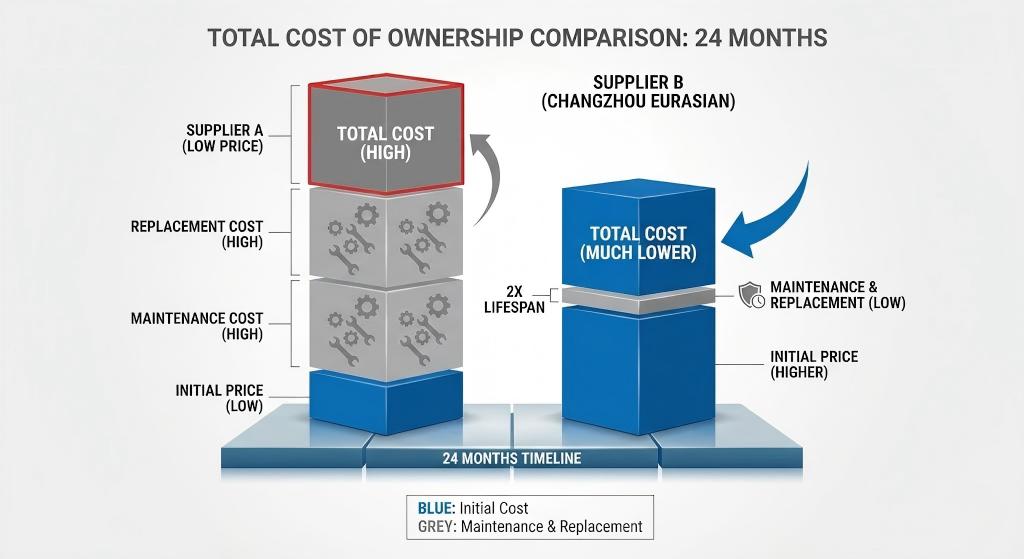
Total cost of ownership (TCO) calculator: Factor replacement frequency, downtime costs, inspection labor
Example TCO Analysis:
Supplier A: $12/ball, 14-month lifespan → $10.29/year
Supplier B: $18/ball (+50% unit cost), 28-month lifespan → $7.71/year (-25% TCO)Pricing Transparency Checklist:Always clarify what's included in quotes:
-
[ ] Material grade (WC powder classification, Co %)
-
[ ] Precision grade with actual tolerance values
-
[ ] Inspection scope (100% dimension check? Sample-based hardness?)
-
[ ] Packaging type (anti-rust treatment, VCI bags?)
-
[ ] Incoterms (FOB, CIF, DDP?)
-
[ ] Payment terms and currency
-
[ ] Minimum order quantity (MOQ) per specification
5. Supply Chain Reliability Metrics
Lead Time Benchmarks:
-
Standard sizes (1-20mm, G25-G100): 3-4 weeks after order confirmation
-
Custom specifications: 6-8 weeks including first article inspection (FAI)
-
Emergency orders: Reliable suppliers maintain safety stock for common sizes (typically 500-2000 pcs per SKU)
-
Re-orders for approved specifications: 2-3 weeks (eliminates FAI cycle)
Capacity Indicators:
-
Monthly production capacity: Reputable manufacturers produce 50+ tons/month (calculated as finished carbide ball output, excluding grinding scrap)
-
Multi-shift operations ensure consistent quality (avoid single-shift facilities with fluctuating QC)
-
Raw material inventory: 60-90 days buffer indicates financial stability
-
Sintering furnace quantity: Minimum 3-5 vacuum furnaces to handle batch segregation and prevent cross-contamination
Geographic Considerations:
-
Chinese manufacturers: Cost advantage of 25-35% vs. Western suppliers; dominant global market share (production ~83% of global supply as of 2024, though reserves represent ~52% of known deposits – Source: USGS Mineral Commodity Summaries)
-
European/US suppliers: Premium pricing but shorter lead times for domestic buyers (5-10 days typical)
-
Freight costs for tungsten carbide spheres:
-
Sea freight: $0.08-0.15/ball (bulk orders >1000 kg, 25-35 days)
-
Air freight: $0.35-0.60/ball (urgent orders, 5-7 days)
-
Packaging weight factor: 1.8-2.2x ball weight due to anti-corrosion materials and cushioning
Supply Chain Risk Mitigation:Given tungsten's supply concentration (China accounts for ~83% of production despite holding ~52% of global reserves – 2024 USGS data), consider:
-
Dual-sourcing strategy: Primary Asian supplier + secondary Western backup
-
Long-term pricing agreements: 12-24 month contracts with quarterly escalation clauses tied to APT index
-
Inventory buffering: Maintain 90-120 days on-site stock for mission-critical applications
-
Material substitution planning: Identify alternative grades (e.g., steel, ceramic) for lower-severity applications to reduce tungsten dependency
http://www.cnballs.cn
Eurasian -
-
AuthorPosts
- You must be logged in to reply to this topic.
